Deploying with Docker and Kubernetes - tutorial from your PC to AWS EC2, Google cloud, Microsoft Azure or any private servers
You might have read my first post about deployment with Chef technology one year ago.
1 year later, things have changed a bit, become easier, in particular with the arrival of the opensource technology Kubernetes (K8s) from Google, a very comprehensive framework based on Docker technology.
Before going deep into the motivations for the shift and the generalization, just keep in mind that deploying any Docker container on Google Cloud AppEngine is just 2 command lines :
gcloud config set project PROJECT_ID
gcloud preview app deploy app.yaml
It is a very good first step for any project. In this post, we’ll see why AppEngine is the first step of a bigger concept that generalizes to deployment of all your apps, anywhere. For an overview of AppEngine have a look at this post.
The needs for deployment
The needs are still the same :
- Deploy applications quickly and predictably
- Scale applications
- Deploy continuously new features (continuous deployment)
- Optimize cost
- Be independent : be able to deploy on multiple providers
This is the last point I will show in practice in this tutorial.
The main problem is the lack of support from main providers, the absence of warranties, and changes in specifications without consultation (modification or removal of some specifications) which lead you to adapt to all the changes of their platforms - quite unevitable.
The solution against technological dependency might be
-
the “oakham razor” principle : build specifically for what you need, without the superfluous. Performance, and work efficency will be better, but in case of an unprecise need, you’ll finish at end having re-implemented every functionality of some market solutions,
-
the “standard” principle, meaning to use a technology if it is widely adopted by a real sufficient number of customers,
-
the “open-source” principle, where the community will provide lot’s of advantages such as the wide adoption, the reliability, the number of features and extensions, the availability of developers and support, and a long term life cycle.
The shift in methodology
Old methods use dedicated servers
-
Data privacy with on-premise servers
-
Performance guarantees
Current methods use virtual servers : the build occurs during deployment, with deployment scripts, and update scripts, inside the virtual machine, and for all applications at the same time. These methods, brought by technologies such as Chef, Puppet or Ansible, have the benefits of scalability and reproducibility.
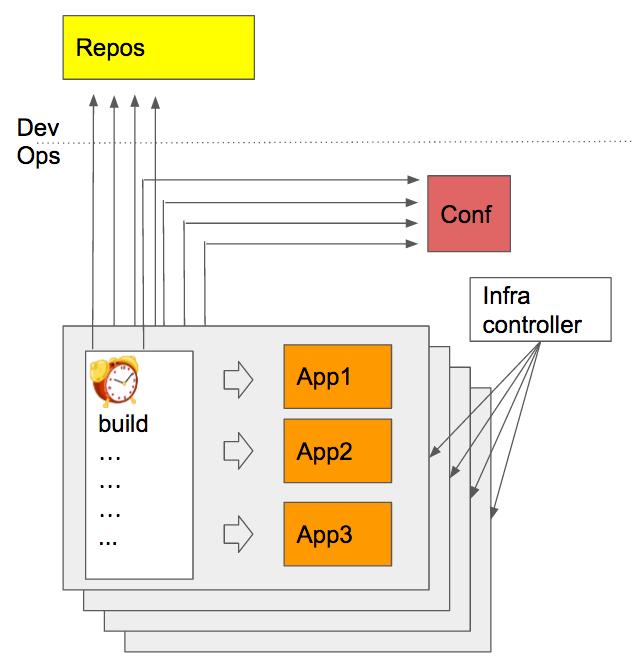
Docker and deployment platform technologies have enabled new deployment methods, that add new benefits to the previous ones :
-
builds occur during development time (not deployment) which leads to a better consistency between dev and prod stages
-
apps are separated into different containers, which implies loose coupling and modularity
-
deployment supervised by infrastructure is more reliable than with scripts and agents inside the VM
-
monitoring of containers is easier than VM
-
the slow process of launching a VM occurs only once, and deploying an app means in this case managing containers, which leads to better agility
-
containers can be deployed on different provider, or even on-premise instances, this is portability
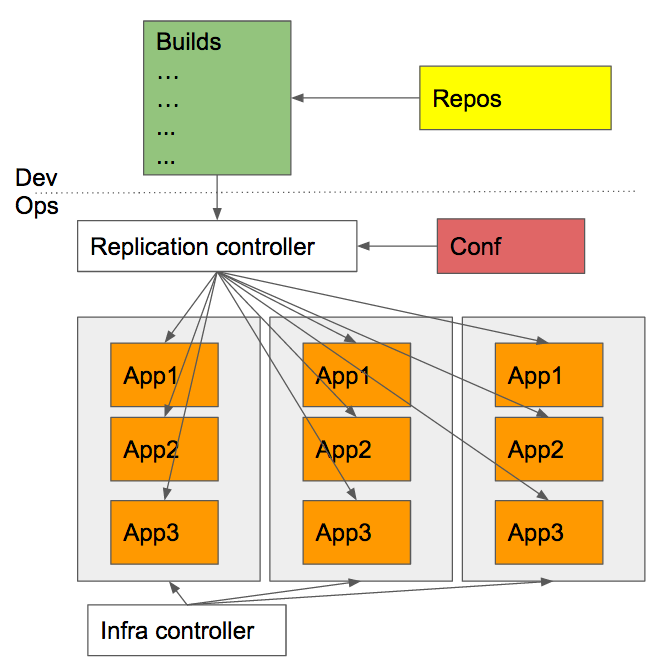
Each container can have its own IP.
Let’s see in practice how to deploy on a cluster on your machine, and on clusters of VM in the AWS EC2 and Google Cloud.
Pre-requisites
Install Docker,
Install and configure the SDK for your cloud provider if you want to deploy to one of them :
- AWS CLI with an AWS account,
In the AWS console, add a policy for your user to access the AWS ECR :
{
    "Version": "2012-10-17",
    "Statement": [
        {
            "Sid": "St",
            "Effect": "Allow",
            "Action": [
                "ecr:*"
            ],
            "Resource": [
                "*"
            ]
        }
    ]
}
- GLOUD CLI with a Google Cloud account and a new project, and set
gcloud config set compute/zone eu-central1-b
#or
gcloud config set compute/zone europe-west1-c
Create an app, package it in a container and publish to a Docker registry
Let’s create a very simple nodeJS app as explained in Kubernetes Hellonode example with one file server.js :
var http = require('http');
var handleRequest = function(request, response) {
  response.writeHead(200);
  response.end("Hello World!");
}
var www = http.createServer(handleRequest);
www.listen(8080);
and a Dockerfile :
FROM node:0.12
EXPOSE 8080
COPY server.js .
CMD node server.js
Docker will play a central role. Build it :
# start the default Docker VM
docker-machine start

# build your Docker image
docker build -t hello-node:v1 .

# check if your image is correctly there
docker images
Publish your image to a container registry (Docker, Google or AWS):
# Google : use the project ID of your project in your Google cloud console
docker tag hello-node:v1 gcr.io/PROJECT_ID/hello-node:v1
gcloud docker push gcr.io/PROJECT_ID/hello-node:v1

# AWS
aws ecr create-repository --repository-name hello-node
$(aws ecr get-login)
docker tag hello-node:v1 AWS_ACCOUNT_ID.dkr.ecr.REGION.amazonaws.com/hello-node:latest
docker push AWS_ACCOUNT_ID.dkr.ecr.us-east-1.amazonaws.com/hello-node:latest
Install Kubernetes and launch the cluster of VM
On Google Compute Engine, it’s quite easy to install Kubernetes and launch a cluster of VM :
# Google cloud
gcloud components install kubectl
gcloud container clusters create cluster-1
gcloud config set container/cluster cluster-1
gcloud container clusters get-credentials cluster-1
gcloud container clusters list
If you want to install Kubernetes and launch a Kubernetes cluster directly, you can with the following scripts :
# Google
export KUBERNETES_PROVIDER=gke; wget -q -O - https://get.k8s.io | bash

# AWS
export KUBERNETES_PROVIDER=aws; wget -q -O - https://get.k8s.io | bash

# vagrant (on local virtual machines)
export KUBERNETES_PROVIDER=vagrant; wget -q -O - https://get.k8s.io | bash
A complete list of available providers includes Microsoft Azure, … and others.
For AWS, you can also deploy your Docker using ECS interface, but I’ll prefer to use Kubernetes as “standard” layer above all cloud providers.
Run your container on the cluster
kubectl run hello-node --image=gcr.io/PROJECT_ID/hello-node:v1 --port=8080
kubectl get deployment hello-node
Scale the number of replicas
kubectl scale deployment hello-node --replicas=4
kubectl get deployment hello-node
Replicas will be added automatically.
Expose your deployment to Internet with the creation of a loadbalancer
kubectl expose deployment hello-node --type="LoadBalancer"
kubectl get services hello-node
External IP will be displaid after a few minutes.
Deploy an update
kubectl edit deployment hello-node
Modify v1 with v2 and save. Updates will occur automatically.
Delete
# Google
kubectl delete service,deployment hello-node
gcloud container clusters delete cluster-1
# in case of a cluster launched by Kubernetes script
#and not gcloud sdk, use cluster/kube-down.sh command
gsutil rm -r gs://artifacts.<PROJECT_ID>.appspot.com/
gsutil ls

# AWS
aws ecr delete-repository --repository-name hello-node --force
aws ecr describe-repositories
Last
Kubernetes offer many more possibilities:
-
creating
namespacesto isolate users of a cluster, defining quotas, … -
creating a secure proxy from your localhost to a pod
kubectl port-forward POD_NAME PORT:LOCAL_PORT
- autoscaling
# number of pods between 2 to 10, target average CPU utilization at 80%
kubectl autoscale deployment DEPLOYMENT_NAME --min=2 --max=10 --cpu-percent=80
Kubernetes simplifies the deployment of apps in a uniform way: on any infrastructure where Kubernetes is installed, you can launch your apps the same way.
Remember also the AppEngine cluster launch in 2 command lines in the introduction of this post : the difference is that AppEngine clusters are fully-managed by Google, with few options controlled via the app.yaml file or in the AppEngine console web interface. In many cases, AppEngine will be sufficient to cover your needs at the start of a project.
Have a look at a Spark deployment with Kubernetes for example which enables to have Spark and your apps run in the same environment.