Interface-oriented programming in OpenOffice / LibreOffice : automate your office tasks with Python Macros
OpenOffice or LibreOffice ?
OpenOffice and LibreOffice are the main open-source office suites, the opensource equivalent to Microsoft Office, to create text document, spreadsheets, presentations and drawings.
LibreOffice was a fork of OpenOffice.org (when OpenOffice went under Oracle’s umbrella) and is built on the original OpenOffice.org code base.
Both are equivalent, but the usual advise is to use LibreOffice (see the differences) since it is the project of the volunteers from the open-source community and has been developping more quickly.
I’ll speak about LibreOffice now, but the same is true for OpenOffice.
and in the menu bar LibreOffice > Preferences, enable macros
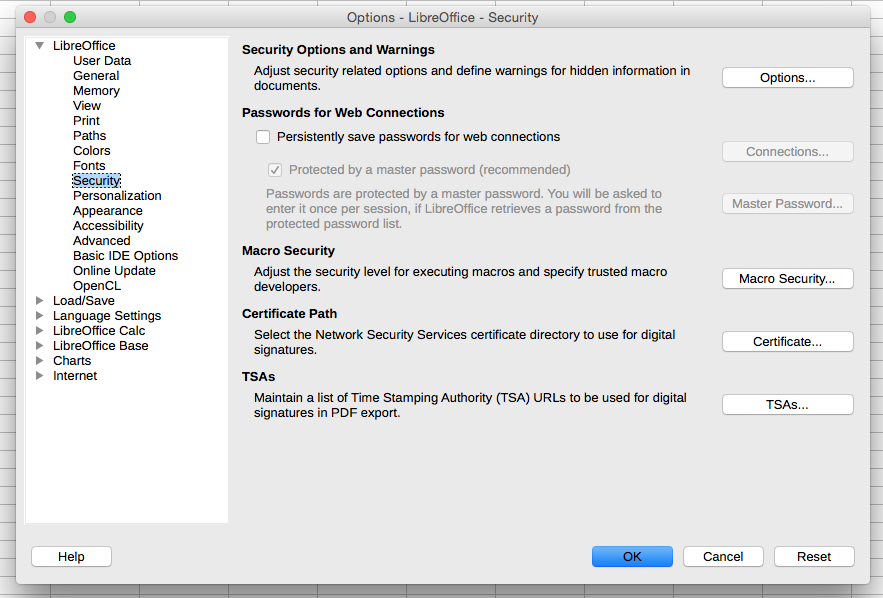
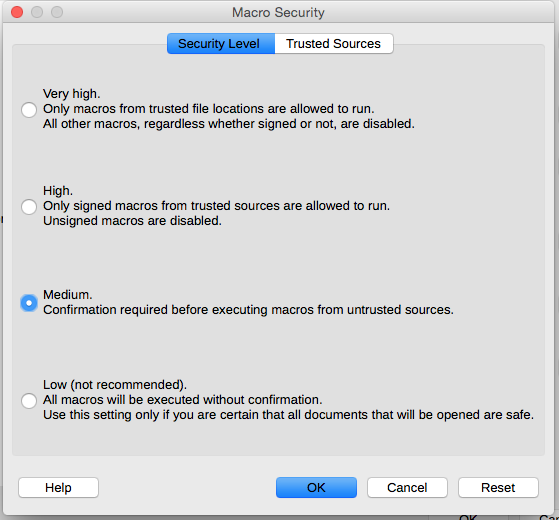
I would recommend you to set Macro security to Medium which will not block nor allow macros but alert you to choose if you trust the editor of the document :
Which language choice for writing your LibreOffice macros ?
Macros are scripting for the office suite.
Many languages are accepted by the LibreOffice API, thanks to the Universal Network Objects (UNO). Among them are : Visual Basic, Java, C/C++, Javascript, Python.
The API is interface-oriented, meaning your code communicate with the controller of the interface and the document has to be open. Many other Python libraries are not interface-oriented, creating directly the file in the Open Document format and saving it to disk with the correct extension
- .odt for text files
- .ods for spreadsheets
- .odp for presentations
- .odg for drawings
For the choice of the language, I would first insist on the multi-platform requirement, which means it’s better if the macro / script can be executed on different platforms such as Windows, Mac OS or Linux, because LibreOffice is also multi-platform and documents will be shared between users from which we cannot expect a particular platform. Visual Basic is not multi-platform and would require significant changes from one plateform to another (Visual Basic, Real Basic, AppleScript…).
Java and C/C++ require compilation, are much more complex and verbose.
For a scripting need, I would advise Javascript or Python. Both are very present in script development world wide and are standards de facto. Many tools have been built for task automation on Javascript, such as Cordova (the multi-platform mobile app framework) or Grunt. Many other tools are using Python as well, such as AWS CLI for example.
I would advise to write most of your code logic outside the interface-orientated architecture, following a standard code architecture, with your common NodeJS dependencies or Python libraries.
But, Javascript could be not precise enough to work nicely in your spreadsheets (even though there exists very nice libraries for numeric computation) and could be disconcerting for your Office users due to rounding errors ( 0.1 + 0.2 does not equals 0.3 in Javascript).
On the contrary, Python has been used extensively for numeric computation, with famous libraries such as Numpy, Numexpr … which make it perfect for spreadsheet macros.
Python has also numerous available libraries for other purposes, due to its success and support from big digital companies, such as Excel reading or writing libraries which make it the perfect choice for macro development.
Even though Python 2.7 still remains very used, and Python 3 introduced differences, the latest version of LibreOffice comes with Python 3.3, so the use of Python 3.3 is advised for durability.
/Applications/LibreOffice.app/Contents/MacOS/python --version
#Python 3.3.5
First play with the Python shell to get familiar
Before creating your own macro, let’s play with the Python shell and interact with a document, let’s say a spreadsheet.
First launch LibreOffice Calc (Calc for spreadsheet open documents) with an open socket to communicate with from the shell on your Mac OS :
/Applications/LibreOffice.app/Contents/MacOS/soffice --calc \
--accept="socket,host=localhost,port=2002;urp;StarOffice.ServiceManager"
(for the Windows command : "C:\\Program Files (x86)\LibreOffice 5\program\soffice.exe" --calc --accept="socket,host=localhost,port=2002;urp;" but if any trouble, have a look the proposed workarounds).
and launch the Python shell
/Applications/LibreOffice.app/Contents/MacOS/python
(for the Windows command : "C:\\Program Files (x86)\LibreOffice 5\program\python.exe").
Python-Uno, the library to communicate via Uno, is already in the LibreOffice Python’s path.
To initialize your context, type the following lines in your python shell :
import socket  # only needed on win32-OOo3.0.0
import uno

# get the uno component context from the PyUNO runtime
localContext = uno.getComponentContext()

# create the UnoUrlResolver
resolver = localContext.ServiceManager.createInstanceWithContext(
				"com.sun.star.bridge.UnoUrlResolver", localContext )

# connect to the running office
ctx = resolver.resolve( "uno:socket,host=localhost,port=2002;urp;StarOffice.ComponentContext" )
smgr = ctx.ServiceManager

# get the central desktop object
desktop = smgr.createInstanceWithContext( "com.sun.star.frame.Desktop",ctx)

# access the current writer document
model = desktop.getCurrentComponent()
These lines are common for every documents (Text, Spreadsheet, Presentation, Drawing).
Now you can interact with the document.
Since we launched LibreOffice with --calc option, let’s try the spreadsheet interactions :
# access the active sheet
active_sheet = model.CurrentController.ActiveSheet

# access cell C4
cell1 = active_sheet.getCellRangeByName("C4")

# set text inside
cell1.String = "Hello world"

# other example with a value
cell2 = active_sheet.getCellRangeByName("E6")
cell2.Value = cell2.Value + 1

# get actually used rectangle of the spreadsheet
cursor = active_sheet.createCursor()
cursor.gotoEndOfUsedArea(False)
cursor.gotoStartOfUsedArea(True)

# print text of every leftmost cell inside every row
for row in cursor.Rows:
    print(row.getCellByPosition(0, 0).String)
If you open a text document and access it with a new document writer, you can try the following interactions :
# access the document's text property
text = model.Text

# create a cursor
cursor = text.createTextCursor()

# insert the text into the document
text.insertString( cursor, "Hello World", 0 )
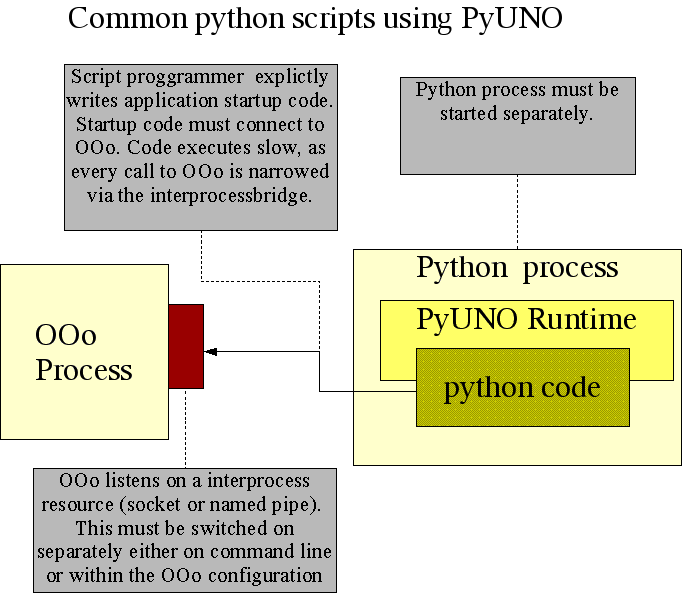
Here is a schema for what we’ve just done : the shell communicates with the LibreOffice runtime to command actions inside the current document.
Create your first macro
It is the other mode, the macro is called from inside the Libreoffice program :
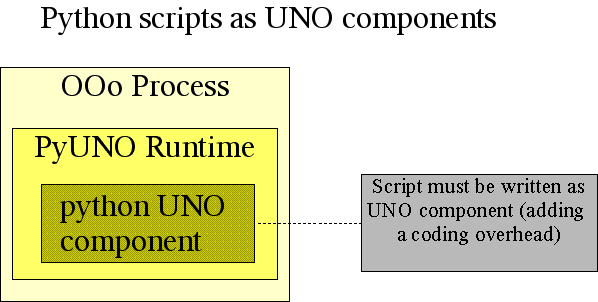
OpenOffice.org does not offer a way to edit Python scripts. You have to use your own text editor (such as Sublim, Atom…) and your own commands.
There are 3 places where you can put your code. The first way is to add it as a library for LibreOffice in one of the directories in the PYTHONPATH
import sys
for i in sys.path:
     print(i)
which gives
/Applications/LibreOffice.app/Contents/Resources
/Applications/LibreOffice.app/Contents/Frameworks
/Applications/LibreOffice.app/Contents/Frameworks/LibreOfficePython.framework/Versions/3.3/lib/python3.3
/Applications/LibreOffice.app/Contents/Frameworks/LibreOfficePython.framework/Versions/3.3/lib/python3.3/lib-dynload
/Applications/LibreOffice.app/Contents/Frameworks/LibreOfficePython.framework/Versions/3.3/lib/python3.3/lib-tk
/Applications/LibreOffice.app/Contents/Frameworks/LibreOfficePython.framework/Versions/3.3/lib/python3.3/site-packages
/Applications/LibreOffice.app/Contents/Frameworks/LibreOfficePython.framework/lib/python33.zip
/Applications/LibreOffice.app/Contents/Frameworks/LibreOfficePython.framework/lib/python3.3
/Applications/LibreOffice.app/Contents/Frameworks/LibreOfficePython.framework/lib/python3.3/plat-darwin
/Applications/LibreOffice.app/Contents/Frameworks/LibreOfficePython.framework/lib/python3.3/lib-dynload
But this is only useful to be used in other macros.
The 2 other ways are to insert your script
-
either globally on your computer, in your local LibreOffice installation,
-
or inside the document, so that when shared another computer (by email, or whatever means), the document has still functional macros.
Let’s see how to install it in the LibreOffice install first, I’ll show you the document-inside install in the next section.
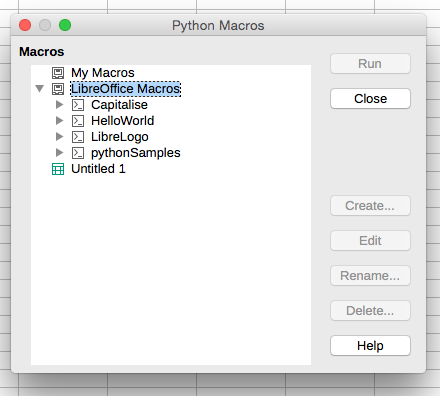
You can find and call your Macro scripts from the LibreOffice menu for macros Tools > Macros > Organize Macros.
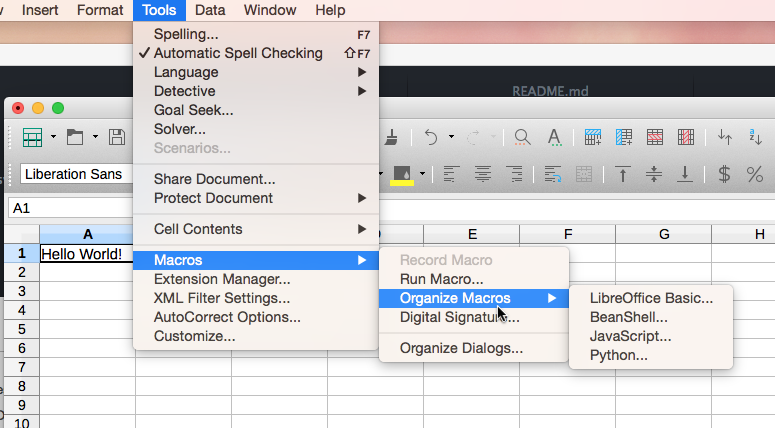
choosing Python :
If you get a “Java SE 6 Error message” such as bellow
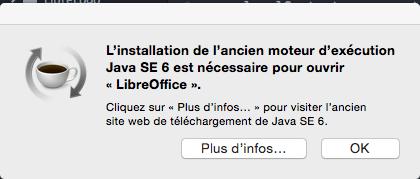
download the Java SE 6 version here.
Let’s edit a first macro script file myscript.py that will print the Python version, creating a method PythonVersion :
import sys
def PythonVersion(*args):
    """Prints the Python version into the current document"""
#get the doc from the scripting context which is made available to all scripts
    desktop = XSCRIPTCONTEXT.getDesktop()
    model = desktop.getCurrentComponent()
#check whether there's already an opened document. Otherwise, create a new one
    if not hasattr(model, "Text"):
        model = desktop.loadComponentFromURL(
            "private:factory/swriter","_blank", 0, () )
#get the XText interface
    text = model.Text
#create an XTextRange at the end of the document
    tRange = text.End
#and set the string
    tRange.String = "The Python version is %s.%s.%s" % sys.version_info[:3] + " and the executable path is " + sys.executable
    return None
and copy it to the Macro directory for LibreOffice :
cp myscript.py /Applications/LibreOffice.app/Contents/Resources/Scripts/python/
(under Windows it is C:\Program Files (x86)\LibreOffice 5\share\Scripts\python directory).
Open a new text document and run it from the menu :
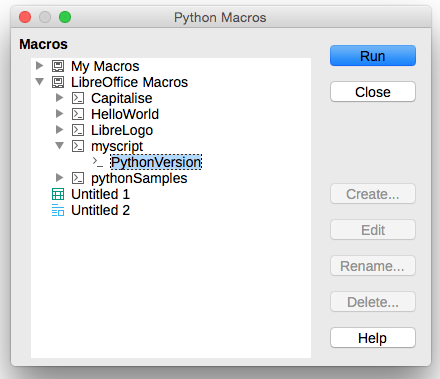
In case there are multiple methods, all of them will be exported, but we can also specify which one to export with the following statement at the end of the file :
g_exportedScripts = PythonVersion,
Its spreadsheet counterpart would be :
import sys
def PythonVersion(*args):
    """Prints the Python version into the current document"""
#get the doc from the scripting context which is made available to all scripts
    desktop = XSCRIPTCONTEXT.getDesktop()
    model = desktop.getCurrentComponent()
#check whether there's already an opened document. Otherwise, create a new one
    if not hasattr(model, "Sheets"):
        model = desktop.loadComponentFromURL(
            "private:factory/scalc","_blank", 0, () )
#get the XText interface
    sheet = model.Sheets.getByIndex(0)
#create an XTextRange at the end of the document
    tRange = sheet.getCellRangeByName("C4")
#and set the string
    tRange.String = "The Python version is %s.%s.%s" % sys.version_info[:3]
#do the same for the python executable path
    tRange = sheet.getCellRangeByName("C5")
    tRange.String = sys.executable
    return None
For distribution of code, OXT format acts as containers of code that will be installed by the Extension Manager or with the command line /Applications/LibreOffice.app/Contents/MacOS/unopkg.
Pack your script inside the document : the OpenDocument format
OpenDocument files are zipped directories.
You can have a look at inside by creating and saving a opendocument spreadsheet document with LibreOffice and then unzipping it :
unzip Documents/test.ods -d test
You’ll get the following list of files and subdirectories in your extracted file :
├── Configurations2
│   ├── accelerator
│   │   └── current.xml
│   ├── floater
│   ├── images
│   │   └── Bitmaps
│   ├── menubar
│   ├── popupmenu
│   ├── progressbar
│   ├── statusbar
│   ├── toolbar
│   └── toolpanel
├── META-INF
│   └── manifest.xml
├── Thumbnails
│   └── thumbnail.png
├── content.xml
├── manifest.rdf
├── meta.xml
├── mimetype
├── settings.xml
└── styles.xml
You can directly append your script to the file with the zipfile library. Let’s create include_macro.py :
import zipfile
import shutil
import os
import sys

print("Delete and create directory with_macro")
shutil.rmtree("with_macro",True)
os.mkdir("with_macro")

filename = "with_macro/"+sys.argv[1]
print("Open file " + sys.argv[1])
shutil.copyfile(sys.argv[1],filename)

doc = zipfile.ZipFile(filename,'a')
doc.write("myscript.py", "Scripts/python/myscript.py")
manifest = []
for line in doc.open('META-INF/manifest.xml'):
  if '</manifest:manifest>' in line.decode('utf-8'):
    for path in ['Scripts/','Scripts/python/','Scripts/python/myscript.py']:
      manifest.append(' <manifest:file-entry manifest:media-type="application/binary" manifest:full-path="%s"/>' % path)
  manifest.append(line.decode('utf-8'))

doc.writestr('META-INF/manifest.xml', ''.join(manifest))
doc.close()
print("File created: "+filename)
such that to include your Python macro inside document.ods, just type command
python include_macro.py document.ods
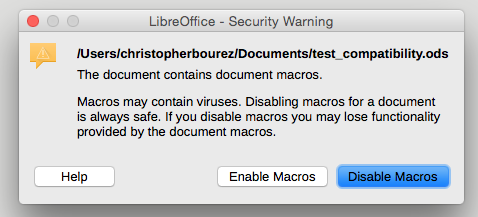
After enabling macros,
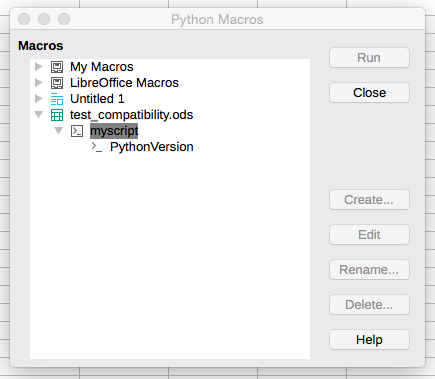
you should be able to run your macro
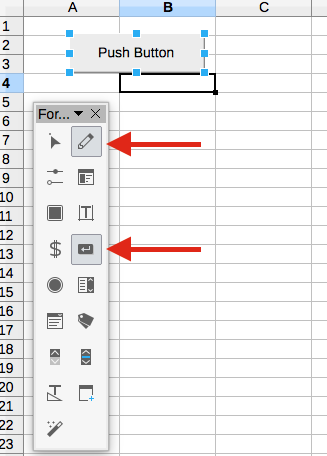
Add a button control to launch your macro
Show the form control toolbar in the menu View > Toolbars > Form Controls, activate Design mode (first red arrow) and add a button (second red arrow) :
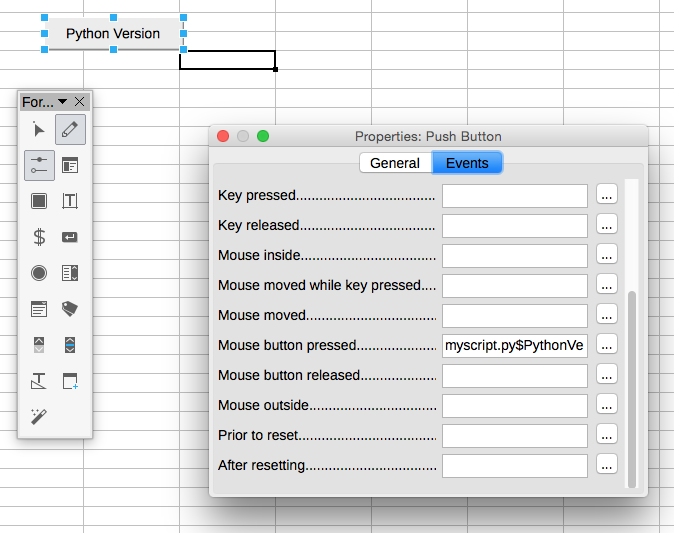
Right click on the button to open the control properties and link with your macro :
Toggle design mode to OFF, close your toolbars. Your document is ready.
You can download my example here. This document can be used to check everything works as espected on the LibreOffice version of your customer.
You can also add the button programmatically :
sheet = model.Sheets.getByIndex(0)

LShape  = model.createInstance("com.sun.star.drawing.ControlShape")

aPoint = uno.createUnoStruct('com.sun.star.awt.Point')
aSize = uno.createUnoStruct('com.sun.star.awt.Size')
aPoint.X = 500
aPoint.Y = 1000
aSize.Width = 5000
aSize.Height = 1000
LShape.setPosition(aPoint)
LShape.setSize(aSize)

oButtonModel = smgr.createInstanceWithContext("com.sun.star.form.component.CommandButton", ctx)
oButtonModel.Name = "Click"
oButtonModel.Label = "Python Version"

LShape.setControl(oButtonModel)

oDrawPage = sheet.DrawPage
oDrawPage.add(LShape)
and add a listener
aEvent = uno.createUnoStruct("com.sun.star.script.ScriptEventDescriptor")
aEvent.AddListenerParam = ""
aEvent.EventMethod = "actionPerformed"
aEvent.ListenerType = "XActionListener"
aEvent.ScriptCode = "myscript.py$PythonVersion (document, Python)"
aEvent.ScriptType = "Script"

oForm = oDrawPage.getForms().getByIndex(0)
oForm.getCount()
oForm.registerScriptEvent(0, aEvent)
or
import unohelper
from com.sun.star.awt import XActionListener

class MyActionListener( unohelper.Base, XActionListener ):
  def __init__(self ):
    print("ok1")
  def actionPerformed(self, actionEvent):
    print("ok2")

doc = model.getCurrentController()
doc.getControl(oButtonModel)
doc.getControl(oButtonModel).addActionListener(MyActionListener())
Start a macro when document starts / opens / is loaded
In the toolbar Tools > Customize, add the macro :
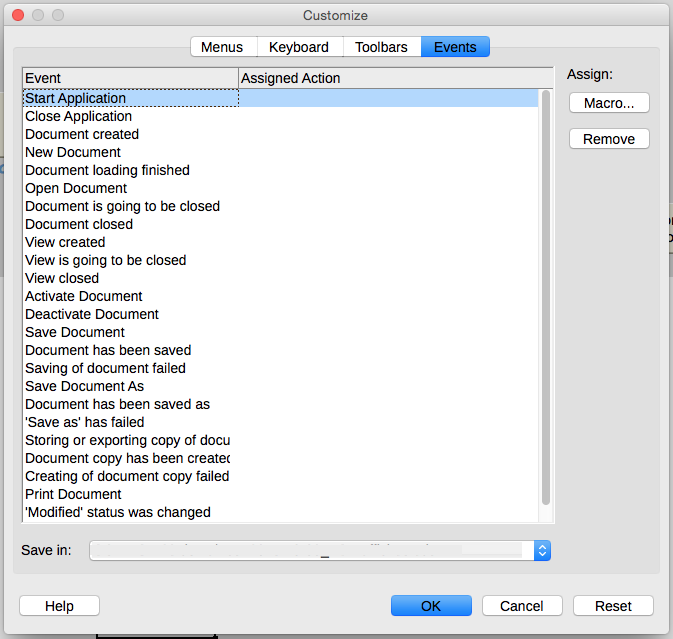
You have the choice to save the preference
-
either in the document itself, in this case the macro will be executed whenever the document is opened on any computer
-
or in the LibreOffice install on your local computer, in this case the macro will be executed for every opened document.
Add a listener when the cell content changes
import uno, unohelper
from com.sun.star.util import XModifyListener

doc = XSCRIPTCONTEXT.getDocument()

#get your sheet and cell
cell = ..

class myChange(XModifyListener,unohelper.Base):
  def __init__(self,):
    self.doc = None
  def setDocument(self, doc):
    self.doc = doc
  def modified(self,oEvent):
    yourFunction()
  def disposing(self,oEvent):
    pass

def AddMyListener:
  m = myChange()
  m.setDocument(doc)
  cell.addModifyListener(m)

g_ImplementationHelper = unohelper.ImplementationHelper()
g_ImplementationHelper.addImplementation(
   myChange,
   'com.sun.star.util.XModifyListener',()
)
g_exportedScripts = AddMyListener,
Spreadsheet methods
Get a sheet
sheet = model.Sheets.getByName(sheet_name)
sheet = model.Sheets.getByIndex(0)
model.getCurrentController.setActiveSheet(sheet) set the sheet active
Protect / unprotect a sheet
sheet.protect(password)
sheet.unprotect(password)
sheet.isProtected()
Get a cell
sheet.getCellByPosition(col, row)
sheet.getCellRangeByName(“C4”)
Get cell range
sheet.getCellRangeByName(“C4:10”)
sheet.getCellRangeByName(“C4:D10”)
Get cell value
cell.getType() cell type (in from com.sun.star.table.CellContentType import TEXT, EMPTY, VALUE, FORMULA)
cell.getValue() or cell.Value
cell.getString() or cell.String
cell.getFormula() or cell.Formula
You can also have a look at number formats, dates, …
Set cell value
cell.setValue(value) or cell.Value=value
cell.setString(string) or cell.String=string
cell.setFormula(formula) or cell.Formula=formula (example : cell.setFormula(“=A1”))
Cell background color (hexadecimal)
cell.CellBackColor=-1 (no color)
cell.CellBackColor=0 (black)
cell.CellBackColor=255 (blue)
cell.CellBackColor=0xFF0000 (red)
Get range value as an array
range.getDataArray()
Document Path
model.URL
import os
if os.name == "nt":
    directory = os.path.dirname(unohelper.fileUrlToSystemPath(model.URL))
else:
    directory = os.path.dirname(model.URL)[7:]
Named Ranges
Named ranges are like “alias” or shortcuts defining ranges in the document :
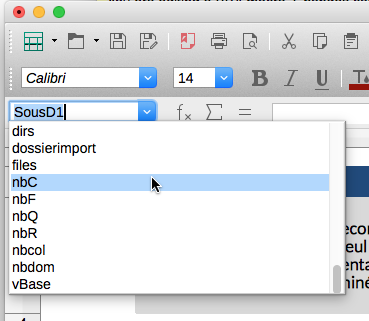
Set a named range :
oCellAddress = active_sheet.getCellRangeByName("C4").getCellAddress()
model.NamedRanges.addNewByName("Test Name","C4",oCellAddress,0)
Get named range :
model.NamedRanges.getByName(“Test Name”)
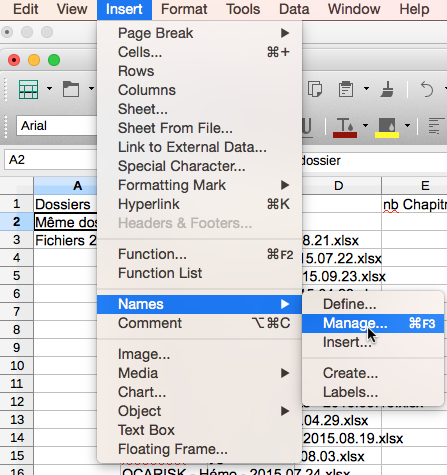
List named ranges :
model.NamedRanges.getElementNames()
Test named range :
model.NamedRanges.hasByName(“dirs”)
Remove a named range :
model.NamedRanges.removeByName(‘dirs’)
get cell column and row
cell.getCellAddress().Column
cell.getCellAddress().Row
get cell sheet
cell.getCellAddress().Sheet
get range column and rowstart/end start/end/count
cell/range.getRangeAddress().StartRow
cell/range.getRangeAddress().StartColumn
cell/range.getRangeAddress().EndRow
cell/range.getRangeAddress().EndColumn
range.Rows.getCount() number of rows
range.Columns.getCount() number of columns
range.getCellFormatRanges()
clear contents
range.clearContents(4) clears the cells with a String as value other clearing flags
delete rows
sheet.getRows().removeByIndex(start_row,nb_rows)
Data pilots (equivalent to Excel’s data pivots)
sheet.getDataPilotTables()
datapilot = sheet.getDataPilotTables().getByIndex(0)
datapilot.SourceRange
datapilot.SourceRange=
datapilot.DataPilotFields
sheet.DataPilotTables.getByIndex(0).refresh()
Shapes
sheet.DrawPage.getCount()
sheet.DrawPage.getByIndex(0)
sheet.DrawPage.getByIndex(17).Visible=False
Charts
Get the charts
oCharts = sheet.getCharts()
Change dataseries order :
oXChartType = oCharts.getByIndex(0).getEmbeddedObject().getFirstDiagram().getCoordinateSystems()[0].getChartTypes()[0]
oSeries = oXChartType.getDataSeries()
oNewSeries = ()
oNewSeries = (oSeries[4], oSeries[3], oSeries[2], oSeries[1], oSeries[0] )
oXChartType.setDataSeries(oNewSeries)
Change color and transparency :
oCharts.getByIndex(pi).getEmbeddedObject().getFirstDiagram().getCoordinateSystems()[0].getChartTypes()[0].DataSeries[0].Color=int("7030A0",16)

oCharts.getByIndex(pi).getEmbeddedObject().getFirstDiagram().getCoordinateSystems()[0].getChartTypes()[0].DataSeries[0].Transparency=50
Deal with enumerations
RangesEnum = active_sheet.getCellRangeByName("C4").getCellFormatRanges().createEnumeration()
while RangesEnum.hasMoreElements():
     oRange = RangesEnum.nextElement()
Export as a CSV in UTF-8
struct3 = uno.createUnoStruct('com.sun.star.beans.PropertyValue')
struct3.Name = "FilterName"
struct3.Value = "Text - txt - csv (StarCalc)"
struct4 = uno.createUnoStruct('com.sun.star.beans.PropertyValue')
struct4.Name = "FilterOptions"
struct4.Value = "59,34,76,1,,0,false,true,true,false"
Current print area
model.CurrentController.ActiveSheet.PrintAreas[0]
Save as PDF
import uno
from com.sun.star.beans import PropertyValue

properties=[]
p=PropertyValue()
p.Name='FilterName'
p.Value='calc_pdf_Export'
properties.append(p)
model.storeToURL('file:///tmp/test.pdf',tuple(properties))

#less verbose :
model.storeToURL('file:///tmp/test2.pdf',tuple([PropertyValue('FilterName',0,'calc_pdf_Export',0)]))
Add filter data options (available options), such a page range :
fdata = []
fdata1 = PropertyValue()
fdata1.Name = "PageRange"
fdata1.Value = "2"
fdata.append(fdata1)

args = []
arg1 = PropertyValue()
arg1.Name = "FilterName"
arg1.Value = "calc_pdf_Export"
arg2 = PropertyValue()
arg2.Name = "FilterData"
arg2.Value = uno.Any("[]com.sun.star.beans.PropertyValue", tuple(fdata) )
args.append(arg1)
args.append(arg2)

model.storeToURL('file:///tmp/test.pdf',tuple(args))
or a selection of cells “$A$1:$B$3”
fdata = []
fdata1 = PropertyValue()
fdata1.Name = "Selection"
oCellRange = param_sheet.getCellRangeByName("$A$1:$B$3")
fdata1.Value =oCellRange
fdata.append(fdata1)

args = []
arg1 = PropertyValue()
arg1.Name = "FilterName"
arg1.Value = "calc_pdf_Export"
arg2 = PropertyValue()
arg2.Name = "FilterData"
arg2.Value = uno.Any("[]com.sun.star.beans.PropertyValue", tuple(fdata) )
args.append(arg1)
args.append(arg2)

model.storeToURL('file:///tmp/test.pdf',tuple(args))
Determining the used area
cursor = sheet.createCursor()
cursor.gotoStartOfUsedArea(False)
cursor.gotoEndOfUsedArea(True)
rangeaddress = cursor.getRangeAddress()
Create a message box
from com.sun.star.awt.MessageBoxType import MESSAGEBOX, INFOBOX, WARNINGBOX, ERRORBOX, QUERYBOX

from com.sun.star.awt.MessageBoxButtons import BUTTONS_OK, BUTTONS_OK_CANCEL, BUTTONS_YES_NO, BUTTONS_YES_NO_CANCEL, BUTTONS_RETRY_CANCEL, BUTTONS_ABORT_IGNORE_RETRY
from com.sun.star.awt.MessageBoxResults import OK, YES, NO, CANCEL

parentwin = model.CurrentController.Frame.ContainerWindow

box = parentwin.getToolkit().createMessageBox(parentwin, MESSAGEBOX,  BUTTONS_OK, "Here the title", "Here the content of the message")

result = box.execute()
if result == OK:
  print("OK")
returns the value.
Have a look here also.
Work on selections using the dispatcher
# access the dispatcher
dispatcher = smgr.createInstanceWithContext( "com.sun.star.frame.DispatchHelper", ctx)

# access the document
doc = model.getCurrentController()

# enter a string
struct = uno.createUnoStruct('com.sun.star.beans.PropertyValue')
struct.Name = 'StringName'
struct.Value = 'Hello World!'
dispatcher.executeDispatch(doc, ".uno:EnterString", "", 0, tuple([struct]))

# focus / go to cell
struct = uno.createUnoStruct('com.sun.star.beans.PropertyValue')
struct.Name = 'ToPoint'
struct.Value = 'Sheet1.A1'
dispatcher.executeDispatch(doc, ".uno:GoToCell", "", 0, tuple([struct]))

# drag and autofill
struct = uno.createUnoStruct('com.sun.star.beans.PropertyValue')
struct.Name = 'EndCell'
struct.Value = 'Sheet1.A10'
dispatcher.executeDispatch(doc, ".uno:AutoFill", "", 0, tuple([struct]))

# recalculate
dispatcher.executeDispatch(doc, ".uno:Calculate", "", 0, tuple([]))

# unDo
dispatcher.executeDispatch(doc, ".uno:Undo", "", 0, ())

# reDo
dispatcher.executeDispatch(doc, ".uno:Redo", "", 0, ())

# quit LibreOffice
dispatcher.executeDispatch(doc, ".uno:Quit", "", 0, ())

# insert rows
dispatcher.executeDispatch(doc, ".uno:InsertRows", "", 0, ())

# delete rows
dispatcher.executeDispatch(doc, ".uno:DeleteRows", "", 0, ())

# insert columns
dispatcher.executeDispatch(doc, ".uno:InsertColumns", "", 0, ())

# delete columns
dispatcher.executeDispatch(doc, ".uno:DeleteColumns", "", 0, ())

# copy, cut, paste
dispatcher.executeDispatch(doc, ".uno:Copy", "", 0, ())
dispatcher.executeDispatch(doc, ".uno:Cut", "", 0, ())
dispatcher.executeDispatch(doc, ".uno:Paste", "", 0, ())

# clear contents of column A
struct = uno.createUnoStruct('com.sun.star.beans.PropertyValue')
struct.Name = 'Flags'
struct.Value = 'A'
dispatcher.executeDispatch(doc, ".uno:Delete", "", 0, tuple([struct]))

# saveAs
struct = uno.createUnoStruct('com.sun.star.beans.PropertyValue')
struct.Name = 'URL'
struct.Value = 'file:///Users/christopherbourez/Documents/test_save.ods'
dispatcher.executeDispatch(doc, ".uno:SaveAs", "", 0, tuple([struct]))

# open
struct = uno.createUnoStruct('com.sun.star.beans.PropertyValue')
struct.Name = 'URL'
struct.Value = 'file:///Users/christopherbourez/Documents/test.ods'
dispatcher.executeDispatch(doc, ".uno:Open", "", 0, tuple([struct]))
You can have a look at other actions such as Protection, Cancel, TerminateInplaceActivation, InsertContents (with properties ‘Flags’,’FormulaCommand’,’SkipEmptyCells’,’Transpose’,’AsLink’,’MoveMode’ )
Have a look at the equivalent in Visual Basic.
Create a dialog
Let’s create and open a dialog with a push button and a label such as :
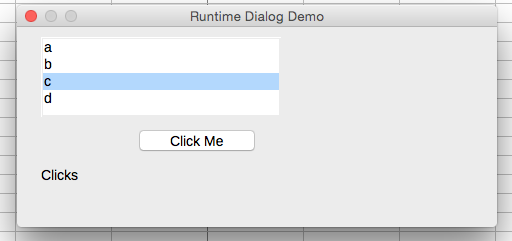
(example from this thread)
# create dialog
dialogModel = smgr.createInstanceWithContext("com.sun.star.awt.UnoControlDialogModel", ctx)
dialogModel.PositionX = 10
dialogModel.PositionY = 10
dialogModel.Width = 200
dialogModel.Height = 100
dialogModel.Title = "Runtime Dialog Demo"

# create listbox
listBoxModel = dialogModel.createInstance("com.sun.star.awt.UnoControlListBoxModel" )
listBoxModel.PositionX = 10
listBoxModel.PositionY = 5
listBoxModel.Width = 100
listBoxModel.Height = 40
listBoxModel.Name = "myListBoxName"
listBoxModel.StringItemList = ('a','b','c')

# create the button model and set the properties
buttonModel = dialogModel.createInstance("com.sun.star.awt.UnoControlButtonModel" )
buttonModel.PositionX = 50
buttonModel.PositionY  = 50
buttonModel.Width = 50
buttonModel.Height = 14
buttonModel.Name = "myButtonName"
buttonModel.Label = "Click Me"

# create the label model and set the properties
labelModel = dialogModel.createInstance( "com.sun.star.awt.UnoControlFixedTextModel" )
labelModel.PositionX = 10
labelModel.PositionY = 70
labelModel.Width  = 100
labelModel.Height = 14
labelModel.Name = "myLabelName"
labelModel.Label = "Clicks "

# insert the control models into the dialog model
dialogModel.insertByName( "myButtonName", buttonModel)
dialogModel.insertByName( "myLabelName", labelModel)
dialogModel.insertByName( "myListBoxName", listBoxModel)

# create the dialog control and set the model
controlContainer = smgr.createInstanceWithContext("com.sun.star.awt.UnoControlDialog", ctx)
controlContainer.setModel(dialogModel)

oBox = controlContainer.getControl("myListBoxName")
oLabel = controlContainer.getControl("myLabelName")
oButton = controlContainer.getControl("myButtonName")
oBox.addItem('d',4)

# create a peer
toolkit = smgr.createInstanceWithContext( "com.sun.star.awt.ExtToolkit", ctx)

controlContainer.setVisible(False)
controlContainer.createPeer(toolkit, None)

# execute it
controlContainer.execute()
but clicking does not execute anything. Let’s close it, add listeners to increase the label counter when clicking the button, and re-open the dialog :
import unohelper
from com.sun.star.awt import XActionListener

class MyActionListener( unohelper.Base, XActionListener ):
  def __init__(self, labelControl, prefix ):
    self.nCount = 0
    self.labelControl = labelControl
    self.prefix = prefix
  def actionPerformed(self, actionEvent):
    # increase click counter
    self.nCount = self.nCount + 1
    self.labelControl.setText( self.prefix + str( self.nCount ) )

# add the action listener
oButton.addActionListener(MyActionListener( oLabel,labelModel.Label ))
oBox.addActionListener(MyActionListener( oLabel,labelModel.Label ))

# execute again
controlContainer.execute()
And let’s delete
# dispose the dialog
controlContainer.dispose()
Working with a form
You might have created a listbox of name “Listbox”

and linked to data :
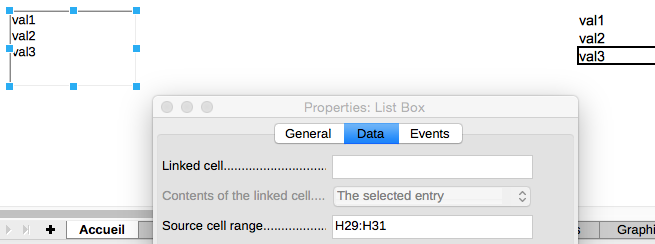
# get the sheet
accueil_sheet = model.Sheets.getByName("Accueil")

# access the draw page
oDrawPage = accueil_sheet.DrawPage

# count the number of form
oDrawPage.getForms().getCount()

# get the list box of the control element
ListBox = oDrawPage.getForms().getByIndex(0).getByName("Listbox")

# get the list box item list
ListBox.StringItemList

# get the list box controller
ListBoxCtrl = model.getCurrentController().getControl(ListBox)

# get the selected items:
ListBoxCtrl.SelectedItems
If the list box view is not in the current active sheet, you can access it with :
for i in range(1, accueil_sheet.DrawPage.getCount()):
    if accueil_sheet.DrawPage.getByIndex(i).Control.Name == "ListBox":
        ListBoxCtrl = accueil_sheet.DrawPage.getByIndex(i).Control
Please do not hesitate to do your contributions to my tutorial.
Well done !