Deploying for your organization - from your PC to your cloud or any servers in one clic
Keywords : continous deployment, AWS, Virtual machines, GIT, IaaC (Infrastructure as a Code), DevOps
NB: this article is a bit outdated. Have a look at my new one.
You’d like to automatize your build, on any machine (your PC, your cloud servers or any server), with a very simple and clean way to do it ?
Here are my best practices I developed using deployment technologies.
Deployment scripts should be written from the start of a project. Creating them later can be a tedious task, whereas if written from the beginning, they will save you some time and some repetitive tasks whenever you need a re-install.
Having a deployment script has the following benefits :
-
a deployment script is a kind of “documentation” for your installation. No need to write a big documentation since every information for installation will be in your code. And in precise detail : it’s a working documentation ! It’s no more a nightmare for the next CTO to take over when the former one leaves the company. And last, everybody has experienced this situation where a single machine in your organization holds a configuration that nobody knows about or does dare to touch… since the developers who developed on it are not there anymore.
-
you can restart from a clean machine. Usually, when installing the required libraries for your code to work, you’ll probably miss writing one step. It’s usually difficult to find this missing step that breaks your install a few weeks later. It’s better to test it right when you develop it, when you’re working on it. Deployment scripts enable you to restart from a clean machine so that you can verify that you missed nothing, that your deployment really works. Another useful case is when you have broken your instance by manipulating your install, you can also restart your instance from a copy of your installation that’s working. So no worry anymore to break your install. You can also launch instances for other developers to check some codes, let them break the install…
-
it’s portable, not dependent on your cloud provider, your server environment (PC, Mac, Linux, …) and enables anybody in any situation to work on your code. No surprise when you launch your deployment on your production stack… if you’ve already tested it on your preproduction stack : the deployment will work in the exact same way on both stacks. Automatization helps you improve stability and human cooperation.
-
it’s scalable. You can add as many servers as you want under your loadbalancer. Believe me, this is useful ! In particular during stress time, or when a migration has failed, or when an error occurs and you cannot find why…
-
it’s fun and a long term savings. It will save you a hundred times doing the same repetitive thing. Just press one button to deploy… everything is automatic. It will offer you new ways to debug by launching new VMs and make tests.
-
it’s continuous deployment, the architectural pattern that deploying many times a day minor releases reduces the risk of critical failure, usually the consequence of infrequent deployments of major releases.
It is true for any organization of any size, from the start-up with one developer (usually when the product is presented to the TV show, the servers are down because of the traffic) to the big corporation which has many servers.
Simplicity, durability, portability and re-usability are the key concepts to search for. Nothing complex will ever last. Nothing specific to one platform will ever be useful.
Choosing the right technology
When choosing a technology, it’s good to think in terms of “standards” because the nightmare could come from
-
available skills on the market
-
durability, support and technical cases on the technology
-
compatibility with other technologies and standards, and availability of connectors (no need to re-develop everything)
Standards are not only those created by standardization organizations such as W3C, but there are also standards de facto, that is technologies adopted world-wide, such as proprietary Microsoft Windows for softwares, or opensource technologies with their huge communities.
In the case of deployment, we have chance because there is a technology, Chef, that meets all the criteria :
-
is an opensource technology, so benefits from the thousands of technical cases on Internet and a wide community, and is certainly the best one in term of power : your infrastructure becomes code.
-
has been choosen by Amazon AWS, the key leading proprietary platform for the cloud industry. So you’ll find plenty of other providers that will follow.
-
works also well with Vagrant, the technology for deploying on your PC. So you can have your application/site on your PC, Mac or Linux computer in the exact same configuration as on your production.
Be careful : it would be a wrong reasoning to make your deployment strategy based on Amazon AWS choices only. Chef is the opensource technology that makes the picture larger than the proprietary scope of Amazon. Therefore,
-
all you find on Internet on how to clone an Amazon AMI, how to install Opsworks Agent or how to simulate Opsworks settings in Chef, for the deployment on your local machine is not a good approach though they are very good articles.
-
at that time, I would recommend to use “custom layers” and not “application layers” in Opsworks, and not use the Apps section because it is specific to Amazon. This would be misleading. I’ll write later more on how to use this.
On the other way, using Vagrant to deploy on Amazon EC2 is not a good solution as well, because you won’t benefit from all the tools that Amazon provides you, such as CloudWatch, auto-healing, etc.
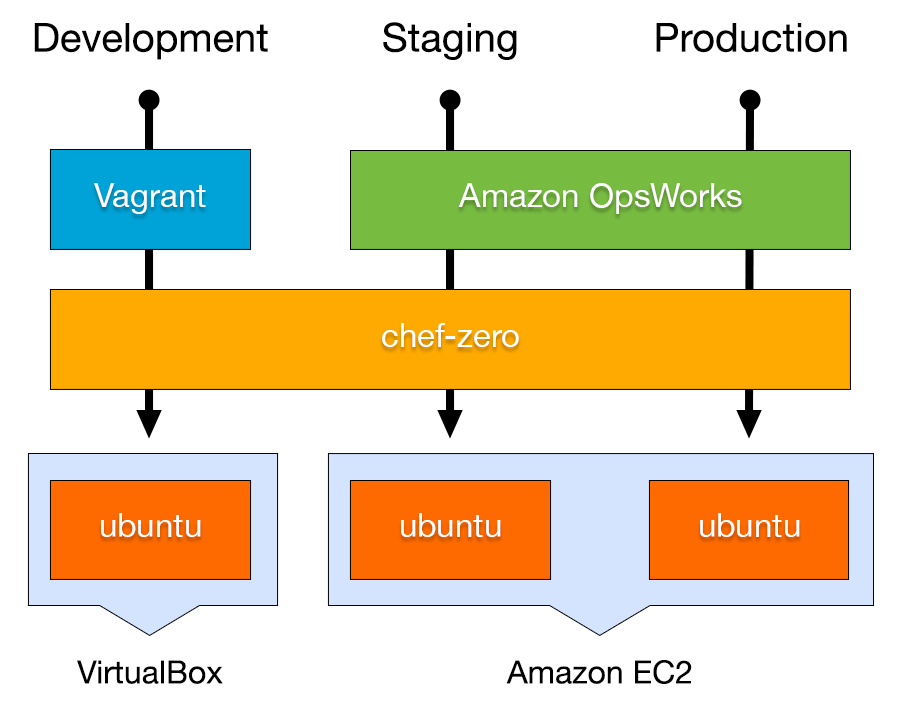
Chef is the common denominator. The same way to deploy everywhere, as shown in the following diagram (thanks @buccolo):
Note about Docker technology : deploying with Docker requires to create a script for the Docker build (the Dockerfile), plus the cookbook script to deploy the Docker, so it’s two times more work, two scripts, much more complexity, and no good solution for parameter management (environments/stacks) and conf files (templates). In case you’d like to mutualise your cookbook and your Dockerfile, you can create a Bash script for the installation, that can be run by the RUN command in the Dockerfile, and by the execute resource in your cookbook.
This will be certainly different when leading cloud providers will provide us Docker deployment specific interfaces, with cost reductions.
Chef, as our opensource standard
Chef enables you to write “recipes” in Ruby to deploy your application/site. Recipes are like scripts to execute on the target machine.
First, create a git repository named chef-deployment under which you’ll write all your recipes and from which you will be able to deploy from anywhere (your PC, your cloud,…). Create a directory named environments to declare your environment variables, and a directory named roles to create lists of recipes to execute together.
chef-deployment/
|--roles/
|--environments/
As we have seen before, the good thing about Chef is that it is supported by Vagrant and Opsworks. More precisely, it’s the standalone version, Chef Solo, that is been used by both.
Vagrant enables you to deploy your application/site on a virtual machine on your PC or Macbook. Opsworks is the Amazon AWS web interface to deploy on the public cloud. In both cases, Vagrant and Opsworks will use
-
your Chef recipes to deploy your application
-
Berkshelf technology to deploy dependencies (common recipes from the community).
There are two minor differences because Opsworks does not support Chef environments and Chef roles - so sad :( :
- the environment / stack difference.
On Vagrant you’ll use the environments to change the parameters :
environments/production.rbandenvironments/development.rb. On Opsworks, you’ll create two stacks, Production and Preproduction. Here is an example of the parameters to configure, that usually contain the hostnames of the search cluster, the database cluster, the S3 bucket or the SES access (*), and the Git release or version to deploy :
{
"java": {
  "jdk_version":"7",
  "oracle":{"accept_oracle_download_terms":"true"},
  "accept_license_agreement":"true",
  "install_flavor":"oracle"
  },
"elasticsearch":{
  "cluter":{"name":"preproduction-xxx"},
  "version":"1.0.1",
  "path":{"data":"/elasticsearch/data"},
  "dns":"xxx-elb"
  },
"sendmail_ses":{
  "username":"xxxx",
  "password":"xxxx",
  "domain":"xxxx",
  "test_user":"test",
  "test_email":"xxxx"
  },
"mysql":{
  "dns":"xxxx",
  "database":"xxxx",
  "user":"xxxx",
  "password":"xxxx"
  },
"aws":{
  "bucket":"xxxx",
  "access":"xxxx",
  "secret":"xxxx"
  },
"my-application": {
  "revision":"release"
  }
}
(*) We’ll speak later about the good use of IAM roles for security, it’s not a best practice to have security credentials in the configuration files as shown here.
- the role / layer difference. For Vagrant you can create Chef roles, a role is a list of recipes to execute, for example you could have a role “front web” to deploy your front servers, a role “database” to deploy your database, and a role “search” to deploy your search cluster. For Opsworks, you’ll create some layers and assign the recipes in the layers as you did in the roles.
These differences are still small.
Vagrant for deployment on your local machine
First, install Vagrant, Chef-DK, VirtualBox on your PC/Macbook.
Second, install Berkshelf plugin for vagrant :
vagrant plugin install vagrant-berkshelf
If you’re on Windows, you’ll probably need to execute
eval `ssh-agent`
ssh-add
In your chef repository, create a file named Vagrantfile at the root
VAGRANTFILE_API_VERSION = "2"

Vagrant.configure(VAGRANTFILE_API_VERSION) do |config|
  config.vm.box = "ubuntu/trusty64"
  config.vm.network "forwarded_port", guest: 80, host: 8080
  config.berkshelf.enabled = true;

  config.vm.provision :chef_solo do |chef|
    chef.cookbooks_path = "./"
    chef.roles_path = "roles"
    chef.environments_path = "environments"
    chef.environment = "development"
    chef.add_role("my-role")
  end
end
This will redirect port 80 to 8080, so for example in the case of a web server Apache or NodeJS, you’ll access your site at http://localhost:8080.
This instructs also
- to execute “my-role”, a list a recipes that will be found in
my-role.rbunder therolesdirectory, for example to executegitandmy-application-cookbooks::my-cookbookrecipes
name "my-role"
description "The base role"
run_list "recipe[git]","recipe[my-application-cookbooks::my-cookbook]"- to use the “development environment”, that will be found in
development.rbunder theenvironmentsdirectory.
Now, it will be quite easy to deploy your machine, just type the following command inside your chef repository :
vagrant up
To connect to the VM
vagrant ssh
To destroy the VM
vagrant destroy
Or to replay the provisionning of your VM with Chef Solo + Bershelf :
vagrant provision
Quite easy !
Opsworks, for deployment on Amazon AWS cloud
In your stack settings,
- Activate Berkshelf
- Indicate your chef repository information
In your layers,
- Indicate your recipes.
Not much more to say. To start an instance, click on the button !
Berkshelf and your first recipe
Oh, now it’s time to write your first recipe.
Add your cookbook folder my-application-cookbooks for deployment of your application, as well as a Berksfile in your chef repository :
my-application-cookbooks/
|--recipes/
   |--my-cookbook.rb
|--attributes/
   |--default.rb
|--files/
|--templates/
   |--default/
|--metadata.rb
Berskfile
The Berksfile enables you to include dependent recipes from the community : for example Apache, MySQL, Monit, … Here is an example of dependency directives in Berksfile :
source 'https://supermarket.chef.io'

cookbook 'chef-sendmail-ses', path: './chef-sendmail-ses'

cookbook 'apt', git: 'git://github.com/opscode-cookbooks/apt.git'
cookbook 'yum', git: 'git://github.com/opscode-cookbooks/yum.git', ref: 'v2.4.4'

cookbook 'ark',  git: 'git://github.com/opscode-cookbooks/ark.git', ref: '0.2.4'
cookbook 'java', git: 'git://github.com/opscode-cookbooks/java.git', tag: 'v1.29.0'

cookbook 'monit', git: 'git://github.com/apsoto/monit.git'

cookbook 'git'

cookbook 'vim'
cookbook 'minitest-handler', git: 'git://github.com/btm/minitest-handler-cookbook.git'
Here is an example recipe my-cookbook.rb with commented sections :
#does an apt-get update
include_recipe 'apt'

#create a directory
directory "/tmp/private_code/.ssh" do
  owner 'www-data'
  recursive true
end

#create a SSH wrapper for deployment
bash "create wrap ssh for git" do
  user "root"
  cwd "/"
  code <<-EOH
   echo '#!/usr/bin/env bash' > /tmp/private_code/wrap-ssh4git.sh
   echo '/usr/bin/env ssh -o "StrictHostKeyChecking=no" -i "/tmp/private_code/.ssh/id_deploy" $1 $2' >> /tmp/private_code/wrap-ssh4git.sh
   chown www-data:www-data /tmp/private_code/wrap-ssh4git.sh
   chmod +x /tmp/private_code/wrap-ssh4git.sh
  EOH
end

#deploy the keys for the my-cookbooks/file/default/id_deploy
cookbook_file "/tmp/private_code/.ssh/id_deploy" do
  source "id_deploy"
  owner 'www-data'
  mode '0700'
end

#create the code directory
directory "/srv/www/xxx" do
  owner 'www-data'
  recursive true
end


#deploy the code
deploy "/srv/www/xxx" do
  repo "git@bitbucket.org:xxxx/xxxx.git"
  revision "release" # or "HEAD" or "TAG_for_1.0" or (subversion) "1234"
  user "www-data"
  enable_submodules true
  symlink_before_migrate.clear
  create_dirs_before_symlink.clear
  purge_before_symlink.clear
  symlinks.clear
  keep_releases 10
  action :deploy # or :rollback
  git_ssh_wrapper "/tmp/private_code/wrap-ssh4git.sh"
  scm_provider Chef::Provider::Git # is the default, for svn: Chef::Provider::Subversion
end

#deploy a paramter file of the site from the my-cookbooks/templates/default/etc.platform.conf.inc.erb
template "/var/web/platform.conf.inc" do
  source "etc.platform.conf.inc.erb"
  mode "0644"
  owner "www-data"
  group "www-data"
end

#install apache packages
%w(apache2 apache2-utils php5 libapache2-mod-php5 php5-curl php5-gd php5-mysqlnd php5-sqlite php5-tidy php5-intl).each do |p|
  package p
end

#create a symbolic link
link "/etc/apache2/sites-available/xxxx.conf" do
  to "/var/web/xxx/virtualhost.conf"
end

#do whatever you want in Bash script !
bash "apache-enable" do
  user "root"
  cwd "/var/web/stt"
  code <<-EOH

  #your code here :
  a2enconf xxx
  a2dissite 000-default
  a2ensite xxxx
  mkdir -p var/cache/{0..9}
  service apache2 reload

  EOH
end
Now you’re ready to deploy your code everywhere the same way !
Thanks a lot for your attention.