Google AppEngine, simply brilliant. Here is an overview
AppEngine is simply tremendous and extraordinary. Its web interface is simply beautifully designed, fluid and effective.
AppEngine has been existing for a while, but since june 2014 it supports Docker technology, the open container standard, under the name of “custom runtimes in the flexible environment”, which offers the ability to do almost anything … in a very “fully-managed” way. Much further than the traditional meaning of “the fully-managed service” : once you’ve created your Docker, you do not have to think anymore about deployment :)
AppEngine is today still in beta, but it reminds me of Gmail which has been in beta for a long while also, and AppEngine might convert everybody to switch to it in the near future as did Gmail with mailboxes. While still in beta, AppEngine, available on european Google accounts, operates on VM located in the US regions for now.
Google Cloud provides also the option to go for more customization : it is the purpose of Google Container Engine, which extends AppEngine with more functions, less management, a better customization of the containers, services, instances, … just in case.
If Google Container Engine could be limitating in some ways also, keep in mind that Google Container Engine is based
-
on an opensource technology (K8s or Kubernetes) that can be installed anywhere, in particular on local or on-premise servers that can become the providers of the same interface for your Docker as the Google Container Engine does (tutorial).
-
on Google Compute Engine, the naked VM, that can be useful in a big project where the install of very specific technologies can be common.
For the same reasons, I would not advise to deploy your code directly in AppEngine standard environment, as it is possible for NodeJS, Java, Python, Go or Ruby codes, because it creates too much adherence to the AppEngine specification. I would advise to always run your app code packaged in Docker containers (“custom runtimes”) on AppEngine, because Docker is an open standard, thats enable your app to be run anywhere else, with the same consistency.
So with Google Cloud, as your needs evolve, you can gain in flexibility, from full management to complete manual setup of public or private instances for the deployment of your Docker containers, each offer based on the more customizable one in the following order :
AppEngine > Container Engine > Compute Engine (naked VM) + Kubernetes (interface to containers)
-
to begin simple
-
in case you need more later on, not to be stuck in some technical limitations
-
to stay independant of Google future, not to stick to AppEngine API only.
But do we really need more than what AppEngine provides ? What are the benefits of AppEngine ? Are you sure to know all about its functions ? Let’s have a look.
Configuring in one command line
After having installed the Gcloud SDK, simply create a project in the Google Cloud console and configure your SDK:
gcloud init
You can re-run this command later on to change your configuration (switch from one project to another one for example).
Publishing in one command line
Create your Docker, with the EXPOSE 8080 command to expose port 8080 that will be used by AppEngine. Once your Dockerfile is ready and has been tested locally, publishing it on AppEngine is just creating a app.yaml file :
runtime: custom
vm: true
automatic_scaling:
  min_num_instances: 1
in the same directory as the Dockerfile and running :
gcloud preview app deploy app.yaml
Once the deployment has finished, your app will be directly available under the URL https://PROJECT_ID.appspot.com.
You can re-run the publish command later on to publish a newer version : you’ll see the version number simply incrementing under the “default service” in the Services section of the web console :

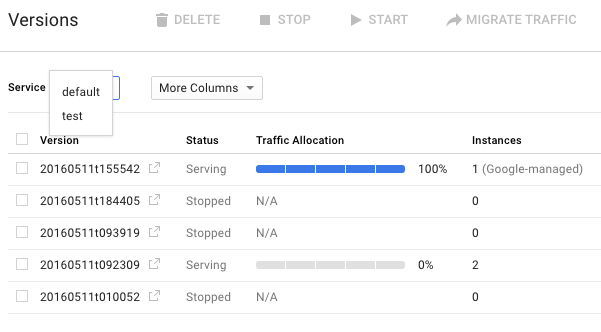
In my case, I submitted 5 times. Under the Versions section, I get the list of submitted versions and on which one the requests (traffic) are served :

Each version will be available under an URL in the format https://VERSION_ID-dot-PROJECT_ID.appspot.com.
The first two parameters of the previous app.yaml file are necessary to be in the “custom runtime + flexible environment” case.
Such a configuration file offers so many customization that will suit your need. For example, the autoscaling. In the case of a simple demo, I had no need for redondancy and wanted with min_num_instances : 1 parameter only 1 instance rather than 2 during idle times (low traffic), in order to reduce the costs. It still provides the autoscaling function in case of a higher traffic :

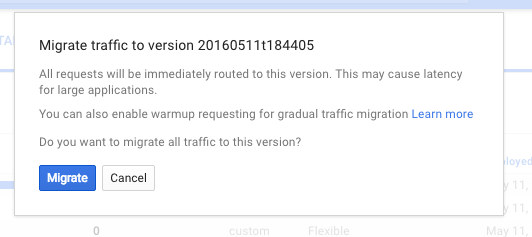
Revert to a previous version in just one clic
It might be that you uploaded an unstable version of the Docker image, in this case it’s time to revert to the previous version rapidly by selecting the previous version in the Versions section and migrating traffic to it :
A/B testing in just one clic
You would have never imagined how easy this could have been. Under the Versions section, click on the “Split Traffic” button to set up an A/B testing between two uploaded docker versions :
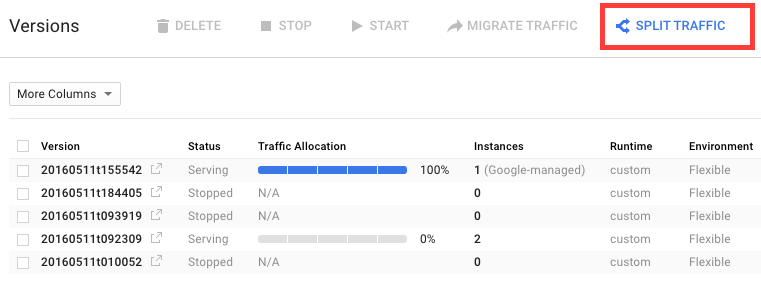
Select the versions and how much traffic to deliver in percentage on each version :

You can divide the traffic between more than 2 different versions : A/B/C/D… testing.
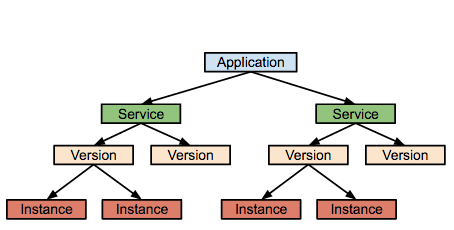
Deploy multiple services
Another architectural pattern is the organization into microservices so that each service will scale independently, with different loadbalancers.
https://cloud.google.com/appengine/docs/java/an-overview-of-app-engine
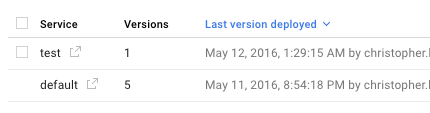
Simply create a microservice in a separate directory, with a Dockerfile and a app.yaml file. Provide the name of the service in the app.yaml file with the attribute service: XXX. Publish the service with the same publishing command than the default one. The service will be give the DNS https://XXX-dot-PROJECT_ID.appspot.com.
As an example, the publication of a second service with the name “test” will be listed under the Versions section :
In the same way, you can decide on each service with which version to serve requests :
Stackdriver monitoring
By default, AppEngine is directly integrated in StackDriver monitoring which is a great dashboard to follow your ap :

Queues
AppEngine comes with queues :
-
pull queues, from which your code can dequeue tasks, by leasing them then deleting them, via the Task Queue API. If the lease expires, the task returns back into the queue.
-
push queues, to execute tasks (registered as “URL” on services) at a specified rate. The queue is “pushing” the tasks to the services. You’ll define a strategy to deal with failure.
-
cron, to execute tasks at specified times with a certain recurrence.
Other features
Define port forwarding other than default (Port 8080), tags, network to be attached, CPU, disk & memory capacity, scaling, health checks, multi threading, environment variables… by configuring correctly the app.yaml.
Instead of an URL in https://PROJECT_ID.appspot.com, add your custom DNS domains and their SSL certificates.
AppEngine provides a memcache to share keys between instances and a blobstore to store data objects.
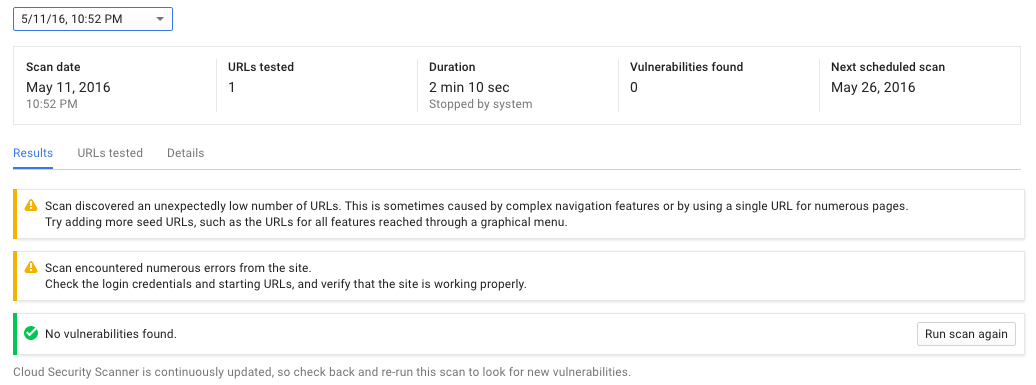
Lastly, AppEngine offers a security scanner that you can run on a daily, weekly, every-2-week or every-4-week basis, to check a list of URL against potential vunerabilities.
Why not shifting all your services to AppEngine ?
Well done Google!